The decision of whether to watermark images posted online is a frequent topic of debate. Proponents say it’s an added measure of security–a notice to would-be image thieves that the photographer takes his or her copyright seriously and will defend it like a mama lion protecting her cubs. Others point out that watermarks are distracting, clients don’t like them, and unscrupulous people with decent editing software can make that watermark disappear in the blink of an eye, so what’s the point? Regardless of where you come down on this issue, sometimes you just find yourself wanting to make sure the world knows that you took the photo.
There are a lot of ways you can do this, but I find most of them to be rather cumbersome. You can create a watermark and save it in various file formats, but that means opening the file and dragging it onto your image each time you want to use it. Chances are that you’ll have to resize it and/or adjust the opacity for every image. I also tried it as a custom shape tool for a while, but that too was an inefficient way of accomplishing what should have been a pretty basic task. I eventually figured out how to create a signature brush in Photoshop, finally finding my perfect solution. I should point out, that I’m one of those people who has pretty much thrown in the towel when it comes to online watermarking. If someone really wants to steal my image, they are going to find a way to do it–with or without a watermark. I do, however, like adding my signature to some of my fine art images.
While I’ve outlined the steps for creating a brush of your signature, the same steps will work for making a brush of your logo.
Step 1 – Sign Your Name
Use a plain white sheet of paper and a fine point Sharpie. The Photoshop part of the process will go much easier with the heavier lines of the marker, but you should also scribble out your signature a bit larger than you ordinarily would. Once your signature looks right, scan it at a high resolution and save the JPEG to your computer. You can try taking a photo if you don’t have a scanner, but fill the frame and make sure that your lens is as parallel to the paper as possible.

Thicker, bolder lines from a marker will make creating the brush easier, yet still give the signature a normal appearance when applied to an image.
Step 2 – Open, Zoom, and Select
Once you open your signature in Photoshop, zoom in nice and tight. Using the magic wand tool (keyboard shortcut W), click on the signature to select it. You should immediately see the “marching ants” flashing across the outline of your signature. If the tool fails to select the entire signature, press and hold the Shift key while you click on parts of the signature that were missed the first time. Since my signature has a break in it, I had to add the second segment with an extra click of the selection tool. You can also right-click and select “Similar” from the context menu, but I find that the shift-click is quicker and more accurate.
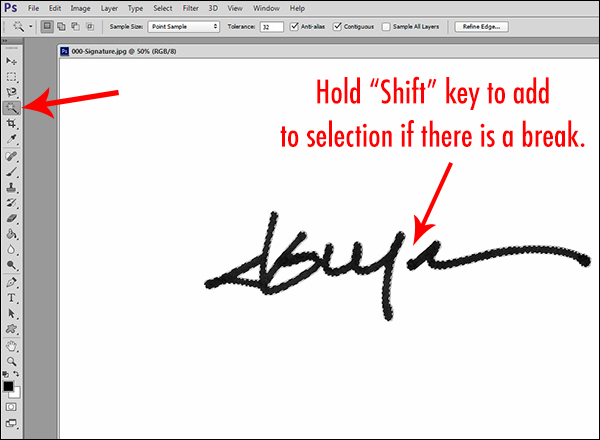
The Magic Wand tool shares its spot in the tools palette with the Quick Selection Tool. Make sure you select the correct one.
Step 3 – Save It and Name It
Once the complete signature is selected, click on the drop-down Edit menu at the top of the window. Clicking on Define Brush Preset will open a dialog box showing a thumbnail of your new brush. Give the brush a name and click “OK.” This will save the brush at its current dimensions in your current brushes set. You can check it by selecting the brush tool (keyboard shortcut B) and opening the preset picker (second drop-down menu from the left at the top of the window). Your new brush will appear at the bottom of the brush set.
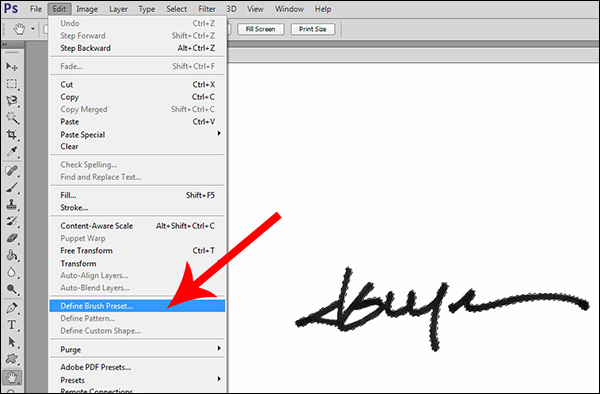
The Define Brush Preset command appears in the drop-down Edit menu.
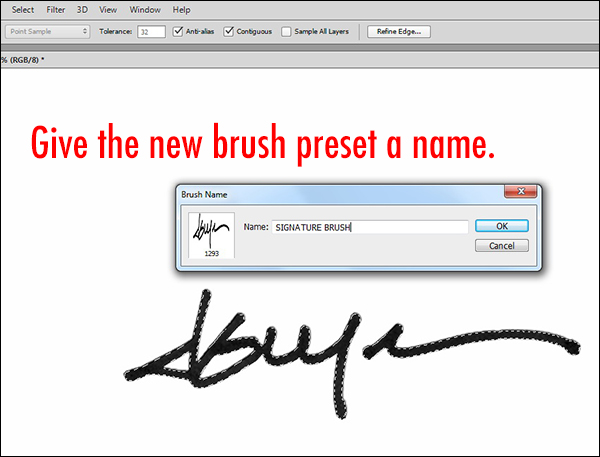
Finding your signature in the brushes palette will be pretty simple, but give it an easy-to-remember name, just in case.
Step 4 – Customize It
Due to the over-sized signature that we used to create the brush, our new brush is way too big for tastefully marking a photo. You can adjust the size within the brush panel, but there is a faster, easier way of doing it right from the keyboard. The right and left bracket keys — [ ] — can be used to adjust the size of the brush. The right key makes it bigger, and the left makes it smaller. You can either create a second preset at a more manageable size, or simply use the bracket keys to make quick size adjustments for each photo as necessary. The preset picker contains a small square icon on the right side. Clicking it will open a dialog box that will allow you to save the new preset at its new size. It’s also worth noting that–just like any other brush in Photoshop–you can change the color and opacity, as well as the hardness or softness of the edges.
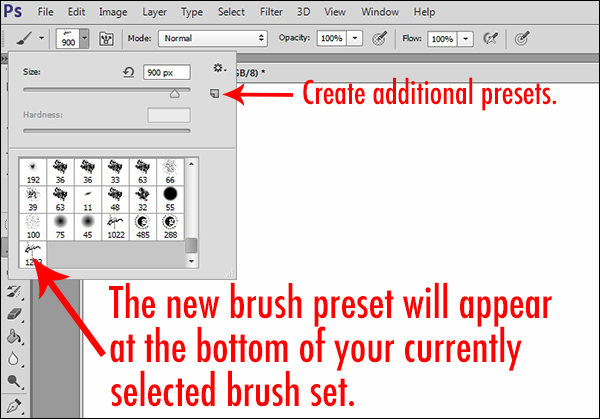
You can further customize the brush by saving another preset with variations of size, color, and opacity.
I find that the best use of this brush is small and subtle, with enough contrast for it to be noticeable, but not too distracting. I usually select a color or shade from within the image to help the signature appear more organic and less out of place. You should also experiment with adjusting the opacity of the brush until you find a combination that suits you.

