CAMERA TRIPODS
A camera tripod can make a huge difference in the sharpness and overall quality of photos. It enables photos to be taken with less light or a greater depth of field, in addition to enabling several specialty techniques. This tutorial is all about how to choose and make the most of your camera tripod.
WHEN TO USE A TRIPOD
A camera tripod's function is pretty straightforward: it holds the camera in a precise position. This gives you a sharp picture when it might have otherwise appeared blurred due to camera shake. But how can you tell when you should and shouldn't be using a tripod? When will a hand-held photo become blurred?
A common rule of thumb for estimating how fast the exposure needs to be is the one over focal length* rule. This states that for a 35 mm camera, the exposure time needs to be at least as fast as one over the focal length in seconds. In other words, when using a 100 mm focal length on a 35 mm camera, the exposure time needs to be at most 1/100 seconds long — otherwise blurring may be hard to avoid. For digital cameras with cropped sensors, one needs to convert to a 35 mm equivalent focal length.
The reason this rule depends on focal length is because zooming in on your subject also ends up magnifying camera movement. This is analogous to trying to aim a laser pointer at a position on a distant wall; the farther this wall is, the more your laser pointer is likely to jump above and below this position due to an unsteady hand:
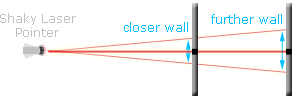
Simulation of what happens when you try to aim a laser pointer at a point on a distant wall;
the larger absolute movements on the farther wall are similar to what happens with camera shake when you are using longer focal lengths (when you are more zoomed in).
Keep in mind that this rule is just for rough guidance. The exact camera shutter speed where camera shake affects your images will depend on (i) how steady you hold the camera, (ii) the sharpness of your lens, (iii) the resolution of your camera and (iv) the distance to your subject. In other words: if in doubt, always use a tripod.
Finally, camera lenses with image stabilization (IS) or vibration reduction (VR) may enable you to take hand-held photographs at anywhere from two to eight times longer shutter speeds than you'd otherwise be able to hold steady. However, IS and VR do not always help when the subject is moving — but then again, neither do tripods.
OTHER REASONS TO USE A TRIPOD
Just because you can hold the camera steady enough to take a sharp photo using a given shutter speed, this doesn't necessarily mean that you should not use a tripod. You might be able to choose a more optimal combination of aperture, ISO and shutter speed. For example, you could use a smaller aperture in order to achieve more depth of field, or a lower ISO in order to reduce image noise; both require a longer shutter speed, which may mean the photo is no longer able to be taken hand-held.

Photo with a smoothed water effect from a long exposure (only possible with a tripod).
In addition, several specialty techniques may also require the use of a tripod:
- Taking a series of photos at different angles to produce a digital panorama.
- Taking a series of photos at different exposures for a high dynamic range (HDR) photo.
- Taking a series of time lapse photographs to produce an animation.
- Taking a series of photos to produce a composite image, such as selectively including people in a crowd, or combining portions lit by daylight with those at dusk.
- Whenever you want to precisely control your composition.
- Whenever you need to have your camera in the right composition well in advance of the shot, such as during a sporting event.
CHOOSING A TRIPOD: TOP CONSIDERATIONS
Even though a tripod performs a pretty basic function, choosing the best tripod often involves many competing factors. Finding the best tripod requires identifying the optimal combination of trade-offs for your type of photography.
The top considerations are usually its sturdiness, weight and ease of use:
Tripod Sturdiness/Stability. This is probably why you purchased a tripod in the first place: to keep your camera steady. Important factors which can influence sturdiness include: (i) the number of tripod leg sections, (ii) the material and thickness of the leg units, and (iii) the length of the legs and whether a center column is needed to reach eye level. Ultimately though, the only way to gauge the sturdiness of a tripod is to try it out. Tap or apply weight to the top to see if it vibrates or sways, and take a few test photos.
Tripod Weight. This can determine whether you take the tripod along with you on a hike, or even on a shorter stroll through town. Having a lighter tripod can therefore mean that you'll end up using it a lot more, or will at least make using it more enjoyable since it won't cause a lot of fatigue when you have to carry it around. However, tripod weight and sturdiness are often closely related; just make sure that you're not sacrificing too much sturdiness in exchange for portability, or vice versa. Furthermore, tripods that do not extend as high may weigh a little less, but these also may not be as versatile as a result.
Tripod Ease of Use. What's the point of having a tripod if it stays in the closet because you find it too cumbersome, or if you miss the shot because it takes you too long to set it up? A tripod should therefore be quick and easy to position. Ease of use depends on the type of tripod head (discussed later), and how one positions the leg sections.
twist lock
Tripod leg sections are usually extended or contracted using a locking mechanism, either with lever/clip locks or twist locks. Lever/clip locks tend to be much quicker to use, although some types can be tough to grip when wearing gloves. Twist locks are usually a little more compact and streamlined though, since they do not have external clips/latches. Twist locks also sometimes require two hands if you want to extend or contract each leg section independently.
CHOOSING A TRIPOD: OTHER CONSIDERATIONS
Other more minor considerations when choosing a tripod include:
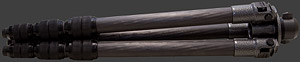
Number of Tripod Leg Sections. Each leg of a tripod can typically be extended using anywhere from two to four concentric leg sections. In general, more leg sections reduce stability, but can also reduce the size of the tripod when it's fully contracted and in your camera bag. Having more leg sections can also mean that it takes longer to position or fully extend your tripod.

Example of a tripod with multiple leg sections extended.
Maximum Tripod Height. This is especially important if you're quite tall, since you could end up having to crouch. Make sure that the tripod's max height specification does not include having to extend its center column, because this can make the camera much less steady. On the other hand, you may not wish to take your photos at eye level most of the time, since this can make for an ordinary looking perspective. Furthermore, the higher you extend your tripod (even without the center column), the less stable it will end up being.
Center column of tripod extends to increase maximum height (at the expense of stability).
Minimum Tripod Height. This is primarily important for photographers who take a lot of macro photographs of subjects on the ground, or who like to use extreme vantage points in their photographs.
Contracted Tripod Height. This is primarily important for photographers who need to fit their tripod in a backpack, suitcase or other enclosed space. Tripods with more leg sections are generally more compact when fully contracted. However, often times more compact tripods either don't extend as far or aren't as sturdy.
TRIPOD HEADS: PAN-TILT vs. BALL HEADS
Although many tripods already come with a tripod head, you might want to consider purchasing something that better suits your shooting style. The two most common types of tripod heads are pan-tilt and ball heads:


Pan-Tilt Heads are great because you can independently control each of the camera's two axes of rotation: left-right (yaw) and up/down (pitch). This can be very useful once you've already gone to great care in leveling the tripod, but need to shift the composition slightly. However, for moving subjects this can also be a disadvantage, since you will need to adjust at least two camera settings before you can fully recompose the shot.
Ball Heads are great because you can quickly point the camera freely in nearly any direction before locking it into position. They are typically also a little more compact than equivalent pan-tilt heads. However, the advantage of free motion can also be a disadvantage, since it may cause your composition to no longer be level when you unlock the camera's position — even if all you wanted to change was its left/right angle. On the other hand, some ball heads come with a "rotation only" ability for just this type of situation. Ball heads can also be more susceptible to damage, since small scratches or dryness of the rotation ball can cause it to grind or move in uneven jumps.
Be on the lookout for whether your tripod head creeps/slips under heavy weight. This is surprisingly common, but is also a big problem for long exposures with heavier SLR cameras. Try attaching a big lens to your SLR camera and facing it horizontal on your tripod. Take an exposure of around 30 seconds if possible, and see whether your image has slight motion blur when viewed at 100%. Pay particular attention to creeping when the tripod head is rotated so that it holds your camera in portrait orientation.
The strength to weight ratio is another important tripod head consideration. This describes the rated load weight of the tripod head (how much equipment it can hold without creeping/slipping), compared to the weight of the tripod head itself. Higher ratios will make for a much lighter overall tripod/head combination.
bubble level
A tripod head with a built-in bubble/spirit level can also be an extremely helpful feature — especially when your tripod legs aren't equally extended on uneven ground.
Finally, regardless of which type of tripod head you choose, getting one that has a quick release mechanism can make a big difference in how quickly you can attach or remove your camera. A quick release mechanism lets your camera attach to the tripod head using a latch, instead of requiring the camera to be screwed or unscrewed.
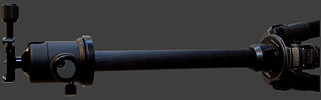
TRIPOD LENS COLLARS
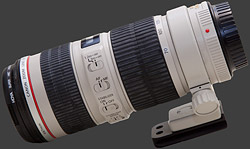
Tripod lens collar on a 70-200 mm lens.
A lens collar is most commonly used with large telephoto lenses, and is an attachment that fits around the lens somewhere near its base or midsection. The tripod head then directly attaches to the lens collar itself (instead of the camera body).
This causes the camera plus lens to rest on the tripod at a location which is much closer to their center of mass. Much less rotational stress (aka torque) is therefore placed on the tripod head, which greatly increases the amount of weight that your tripod head can sustain without creeping or slipping. A lens collar can also make a huge difference in how susceptible the tripod and head are to vibrations.
In other words: if your lens came with a collar, use it! Otherwise you might consider purchasing one if there's a size available that fits your lens.
TRIPOD TIPS FOR SHARP PHOTOS
How you use your tripod can be just as important as the type of tripod you're using. Below is a list of top tips for achieving the sharpest possible photos with your tripod:
- Hang a camera bag from the center column for added stability, especially in the wind. However, make sure that this camera bag does not swing appreciably, or this could be counter-productive.
- Use the center column only after all of the tripod's leg sections have been fully extended, and only when absolutely necessary. The center column wobbles much more easily than the tripod's base.
- Remove the center column to shave off some weight.
- Extend your tripod only to the minimum height required for a given photograph.
- Spread the legs to their widest standard position whenever possible.
- Shield the tripod's base from the wind whenever possible.
- Extend only the thickest leg sections necessary in order to reach a given tripod height.
- Set your tripod up on a sturdy surface, such as rock or concrete versus dirt, sand or grass. For indoor use, tile or hardwood floor is much better than a rug or carpet.
- Use add-on spikes at the ends of the tripod legs if you have no other choice but to set up your tripod on carpet or grass.
TABLETOP & MINI TRIPODS
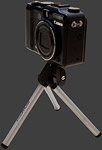
A tabletop or mini tripod is usually used with compact cameras, since this type of tripod can often be quite portable and even carried in one's pocket. However, this portability often comes at the expense of versatility. A tabletop/mini tripod can only really change your camera's up/down (pitch) and left/right (yaw) orientation; shifting your camera to higher or lower heights is not a possibility. This means that finding the best surface to place the tripod is more important than usual with a tabletop/mini tripod, because you also need this surface to be at a level which gives you the desired vantage height.
However, photos taken at eye level often appear ordinary, since that's the perspective that we're most used to seeing. Photos taken at above or below this height are therefore often perceived as more interesting. A tabletop/mini tripod can be one way of forcing you to try a different perspective with your photos.
ALUMINUM vs. CARBON FIBER TRIPODS
The two most common types of tripod material are aluminum or carbon fiber. Aluminum tripods are generally much cheaper than carbon fiber models, but they are often also a lot heavier for an equivalent amount of stability, and can be uncomfortably cold to handle with your bare hands in the winter. Carbon fiber tripods are generally also better at dampening vibrations. However, the best tripod material for damping vibrations is good old-fashioned wood — it's just too heavy and impractical for typical use.
CAMERA MONOPODS
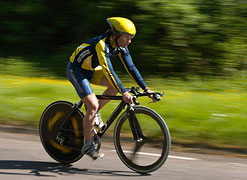
monopod used to track a moving subject
A monopod is a tripod with only one leg. These are most commonly used to hold up heavy cameras and lenses, such as large telephoto lenses for sports and wildlife. Alternatively, monopods can increase hand-holdability for situations where just a little bit longer shutter speed is needed, but carrying a full tripod might be too cumbersome.
A monopod can also make it much easier to photograph a moving subject in a way that creates a blurred background, but yet still keeps the moving subject reasonably sharp (example on left). This technique works by rotating the monopod along its axis — causing the camera to pan in only one direction.
