 “If your spine is inflexibly stiff at 30 you are old; if it is completely flexible at 60, you are young” – Joseph Pilates. The point Joe was making is clear, the flexibility of your spine determines your age more than the number of birthdays you’ve had. Keeping your spine flexible can be a difficult task. As we stand, sit and walk everyday gravity compresses our spine and year after year our disks between the vertebrae that act as the shock absorbers dry out and wear out. At birth the disks between the vertebrae consist of about 80% water. Since the disks don’t have any blood supply, compression and decompression of the disks through movement is what helps to keep the disks hydrated. The theory is that especially during rotation you squeeze the stale fluid from the disks like wringing out a washrag, and when you untwist, the disks are flooded with fresh fluid from nearby tissues. When a disk is only compressed in one way, for example sitting for long periods of time, the compression on the disk is always the same. Without decompression the disk cannot hydrate properly and over time the disk will get less flexible; exposing the disk to injury especially during a sudden move.
During our Pilates workouts we can practice the mechanics of rotation, so that we can compress and decompress the disks properly and create proper alignment of the spine during rotation to facilitate overall mobility and stability.
Rotation of the spine is also important from a movement perspective since we cannot functionally move without rotation. Millions of years ago we evolved from quadrupedal to bipedal (from moving on all fours to standing on two legs) beings. Our bones and joints evolved in order for us to stand and move on two legs; freeing our arms and hands to do whatever we needed them to do. Rotations in the body was one of the evolutions our bodies devised in order for us to stand, move and create overall balance. Regular daily movements often rotate the spine, hips, shoulders and ribcage simultaneously or the rotations in one part of the body affect the others. For example when we walk the pelvis, spine, ribcage, shoulders and arms all create rotations. But in this article we are focussing on rotation of the spine. So, if we took a snapshot during a step forward you will see that a healthy spine is rotated in several directions. With your right leg forward and your left leg behind with the heel lifted and the ball of the foot about to release from the floor; the lumbar spine is rotated to the left, the thoracic spine to the right and the cervical spine back to the left. These rotations in the spine are important as they create stability and create the most efficient movement pattern for the body to move itself forward.
When it comes to the spine, not all parts of the spine are created equal. Different parts of the spine have different primary functions. The function of each part depends on the shape and “special features” of the vertebrae in that specific part of the spine. When it comes to the capability to rotate, the vertebrae higher up the spine can rotate more than the ones on the bottom. The vertebrae in the lumbar spine can only rotate about 2 degrees per joint; adding up to about 12 degrees in total. This is because of the shape of the facet joints (concave and convex, respectively) and the spinous processes which are relatively bigger and project almost straight back. The position and shape of the facet joints and the spinous process makes the vertebrae “lock” into each other when you rotate. The vertebrae in the thoracic spine, even though they are attached to the ribs, rotate more. Primarily because of the different shape and position of the facets joints compared to the facets joints of the lumbar spine. The vertebrae of the cervical spine are specifically designed for mobility and create the most rotation. Besides the differences in the vertebrae, the center of rotation is different between the lumbar and thoracic spine. The center of rotation in the lumbar spine is more posterior (back of the spine) and towards the facet joints. The center of rotation in the thoracic spine is in the body of the vertebrae. When the center of rotation is in the center of the vertebrae (like in the thoracic spine) the disc rotates around itself. To make this easier to understand place a paper plate on a table and place a pen in the middle of the plate. Keep the pen still and rotate the plate around. You will see that the plate rotates “around itself”. This is what happens in the thoracic spine. In the lumbar spine the center of rotation is not in the center of the vertebra; therefore the vertebrae and disc move during the rotation and therefore the amount of rotation is limited. To visualize this place the pen on the edge of the plate and rotate the plate. The plate will no longer rotate “around itself” but it will move to the right or left. This is what happens in the lumbar spine. As the vertebrae and the disks move during rotation, they get stopped by the vertebrae they are connected to and this prevents them from rotating too much.
The great thing about the spine is that all the vertebrae work together to create rotation. Rotation builds up from the base of the spine; one vertebra at a time. Think of it as walking up a spiral staircase, with each step you rotate a little more, so each vertebrae participates in the rotation.
Due to our sedentary lifestyles these days, many people are very tight in their thoracic spine and cannot rotate or control the rotation in this area. The result is that other parts of the spine, most of the time the lumbar spine, has to compensate. As we described, the lumbar spine has limited capabilities of rotation and therefore it is not surprising that many people hurt their lower back when they play sports on the weekend, pick up their child or make a sudden movement.
There are many muscle groups, that facilitate the rotation of the spine. Many of the muscles that actively rotate the torso are quite small like the intercostals. Sometimes the intercostals are tight and restrict rotation in the thoracic spine. Side bends like the mermaid can be a way to stretch the intercostals before you do rotations. Another great exercise is Diagonal Breathing.
Diagonal Breathing
Starting position:
Stand with the right hand across the body on the chest. Place the left hand on the back (same side) on the bottom of the ribs. Fingers facing front. The position of the hands create a diagonal line.
Execution: Inhale: Let the air separate the hands.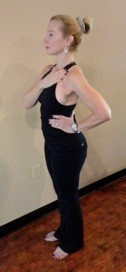
Exhale: let the hands come together.
Repetition: 5 – 10 times each side.
Teaching tips:
- As you inhale, fill up the lung like you are blowing up a balloon. As you exhale deflate your balloon.
- Take your time.
- During the exhalation: “collapse” to emphasize bringing the hands together.
- Do one side. Then before you do the other side, take a few breaths to feel the difference between the two sides.
It can be hard for your clients to feel the different parts of the spine move during rotation, especially the thoracic spine. To make things simpler we often tell our clients to move the ribcage to help facilitate rotation. A great exercise we use to help our clients feel the rotation in the thoracic spine is the Seated rotation with a Theraband™ and TRIADBALL™.
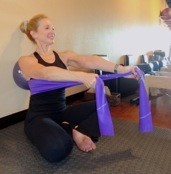
Seated Rotation With A Theraband™ And TRIADBALL™
Starting position:
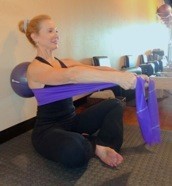 Sit with the legs crossed and with your back almost against the wall. Place a theraband around the shoulders and place a TRIADBALL between the wall and the back (about the height of the shoulder blades). Hold one end of the theraband in each hand and tighten the band as you bring both arms forward inline with the shoulders.
Execution:
Inhale and exhale:
Keeping both arms straight, rotate the upper body and press the left arm, shoulder and ribcage forward as the right side moves back. Reverse.
 Repetition: 5 – 10 sets.
Teaching tips:
- Allow the TRIADBALL to move.
- Keep the arms straight.
- Feel the ribs open as they move forward and the feel the ribs close as they move backward.
- Keep the head still and facing front. • Keep both sits bones on the floor.
One of the most common rotation exercises in Pilates is the spine twist on the mat. There are many versions of the spine twist, but make sure that in the starting position the spine is long and that the body is lifted and able to relax. Yes, you need to be able to relax the body somewhat in order for it to rotate. One of the most common cues is to keep the hips still as we twist. To feel the opposition during this exercise, try the following exercise before you do the spine twist.
Seated Rotation
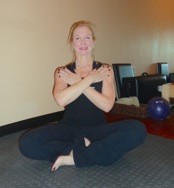 Starting position:
Sit with the legs crossed and cross your arms across your chest and place your hands on your shoulders.
Execution:
Inhale: initiate the rotation by pressing your left sits bone back and down, then slowly twist the body to the right as much as feels comfortable.
Exhale: untwist.
Repetition: 3 – 5 sets.
 Teaching tips:
- Keep the spine long.
- Initiate the movement from the sits bones.
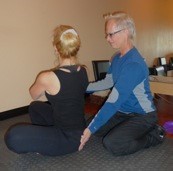
- The teacher can stand behind and place a hand on the back of the pelvis of the “anchoring” sits bone to give external feedback and something to “press into”.
As we mentioned earlier, the spine rotates during walking and running. And you can practice this movement pattern using your Wunda Chair.
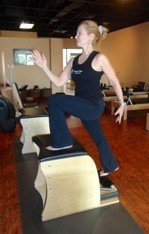
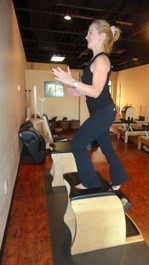
Going Up Front
Also known as: forward lunge/control balance front/front step up.
 Equipment set up:
Like you normally do for your specific chair and capabilities.
Starting position:
Start in your normal position with your left foot on top of the chair with your arms down. Next, bring your right arm forward, keeping it bent, rotate your trunk slightly to the left as if you were going to take a step up the stairs. You might feel a slight rotation in your pelvis as well (left pelvis slightly forward and up) this is okay.
Execution:
Initiating from the trunk, rotate the trunk back (towards the right) and the pelvis back and down, straightening your body as soon as possible as you step up. Bringing the right arm back and the left arm forward. As you bring the pedal down, allow the body to rotate back into the starting position.
 Repetition: 3 – 5.
Teaching tips:
- Breathe naturally.
- Initiate the movement from the trunk (think ribcage).
- Make the movement smooth.
- Give enough springs to make the movement “easy”. This version is about the rotation in the spine.
There are many Pilates exercises that work on rotation and there are many more that allow you to “add” a rotational component to an existing exercise. Keep in mind that rotations and twists should be easy. If the rotation does not happen easily check the mechanics and alignment and/or ask yourself “Is this exercise right for this person?” You can be creative when needed and add your own spin to the Pilates exercises to help your clients, but stay true to the principles of Pilates and the mechanics of rotation.
* Special thanks to Elin Benson for being our model at her studio Premier Pilates of Scottsdale, Arizona .
Workout with Michael and Ton on pilatesanytime.com Use code 6894EBC for a 30 day free trial
Upcoming events with Michael and Ton
Info www.premierpilatesaz.com or email ebpilatesaz@gmail.com
- February 28 – March 2 Zest Convention St. Petersburg, Russia info at www.fitlab.su or email info@fitlab.su
- For a complete calendar for upcoming workshops check www.zenirgy.com